

How to Assemble a Wedding Cake
If you want to impress your guests and save money at the same time, make your own wedding cake.Start with the largest cake layer and tackle the base first. Finishing the bottom tier makes assembling the rest of the cake seem easy!
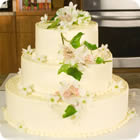
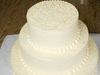
 1. This wedding cake was created using a simple white cake filled with lime curd, a pineapple-rum filling, and coconut frosting.
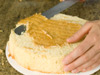 2. With
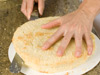
a long serrated knife, trim the "skin" off of the top and bottom of the
cake layers. Trim the top of the cake to create a flat surface. (Wrap
remaining cake rounds in plastic while you assemble one layer at a
time.)
2. With
a long serrated knife, trim the "skin" off of the top and bottom of the
cake layers. Trim the top of the cake to create a flat surface. (Wrap
remaining cake rounds in plastic while you assemble one layer at a
time.)- Start by looking down at the cake and your knife hand to make sure you're holding the knife blade level.
- Crouch down to eye level with the cake, and turn the cake with one hand to score the outer edge and mark where you're going to make your cut.
- (This is when cake turntables come in handy--but a cardboard cake round can be used as well.)
 3. Slice
("torte") the cake into 3/8"-thick to 1/2"-thick layers. The thicker
the layers, the more rustic the look. Cutting a cake round into multiple
thin layers requires more skill, more filling, and more time, but the
look is very elegant and refined--think of a Dobos Torte (although those layers are actually baked individually).
3. Slice
("torte") the cake into 3/8"-thick to 1/2"-thick layers. The thicker
the layers, the more rustic the look. Cutting a cake round into multiple
thin layers requires more skill, more filling, and more time, but the
look is very elegant and refined--think of a Dobos Torte (although those layers are actually baked individually).- Each cake round should yield 2-3 layers, depending upon how thickly you cut them, how full your pans were and how high the cake rose in the oven.
- Special insulated baking strips are available that moderate a cake pan's temperature and help cakes bake evenly, without pronounced rounding in the center. Using these strips can help reduce the amount of cake you'll need to trim to get a flat surface.
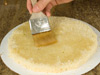 4. Before
adding filling or frosting, brush each cake layer with simple syrup.
Pay particular attention to the edges, as this is where the cake will
begin to dry out.
4. Before
adding filling or frosting, brush each cake layer with simple syrup.
Pay particular attention to the edges, as this is where the cake will
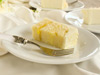
begin to dry out. 5. Spread
a generous layer of filling on each cake layer. If you're using a soft
filling, like mousse or whipped cream, pipe a ring of buttercream around
the edge of the cake to contain the filling.
5. Spread
a generous layer of filling on each cake layer. If you're using a soft
filling, like mousse or whipped cream, pipe a ring of buttercream around
the edge of the cake to contain the filling.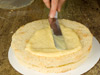 6. Carefully
stack your next cake layer on the frosted or filled bottom layer.
Crouch down at eye level to be sure you've stacked the layers evenly.
Brush the layer with syrup, and spread with filling.
6. Carefully
stack your next cake layer on the frosted or filled bottom layer.
Crouch down at eye level to be sure you've stacked the layers evenly.
Brush the layer with syrup, and spread with filling.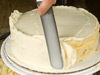 7. When
you've added the top layer, brush it with syrup, and add a generous
dollop of frosting. Don't worry about crumbs; you're going to spread
this layer of frosting fairly thin and refrigerate the cake to create a
"crumb coat" that will seal in the cake and fillings before you frost
and decorate the cake. (This stage is also referred to as "masking the
cake.")
7. When
you've added the top layer, brush it with syrup, and add a generous
dollop of frosting. Don't worry about crumbs; you're going to spread
this layer of frosting fairly thin and refrigerate the cake to create a
"crumb coat" that will seal in the cake and fillings before you frost
and decorate the cake. (This stage is also referred to as "masking the
cake.")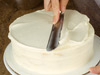 8. Refrigerate the cake for at least an hour, until the frosting is firm to the touch. Note:
butter- and cream cheese-based frostings will firm up more than
frostings made with shortening. If you're using whipped cream as a
frosting, you can apply a thin layer of jam to help contain the crumbs.
There's no need for the extra crumb coat.
8. Refrigerate the cake for at least an hour, until the frosting is firm to the touch. Note:
butter- and cream cheese-based frostings will firm up more than
frostings made with shortening. If you're using whipped cream as a
frosting, you can apply a thin layer of jam to help contain the crumbs.
There's no need for the extra crumb coat.Frost the cake round to create a smooth, even coating.
 9. Refrigerate
the finished cake, and repeat with the remaining tiers. The filled,
frosted cake layers can be refrigerated for up to two days before the
wedding without losing quality--but it's best to use a separate
refrigerator so that the cake won't absorb strong smells from other
foods in the fridge.
9. Refrigerate
the finished cake, and repeat with the remaining tiers. The filled,
frosted cake layers can be refrigerated for up to two days before the
wedding without losing quality--but it's best to use a separate
refrigerator so that the cake won't absorb strong smells from other
foods in the fridge.


0 التعليقات:
إرسال تعليق